A Coupled Approach
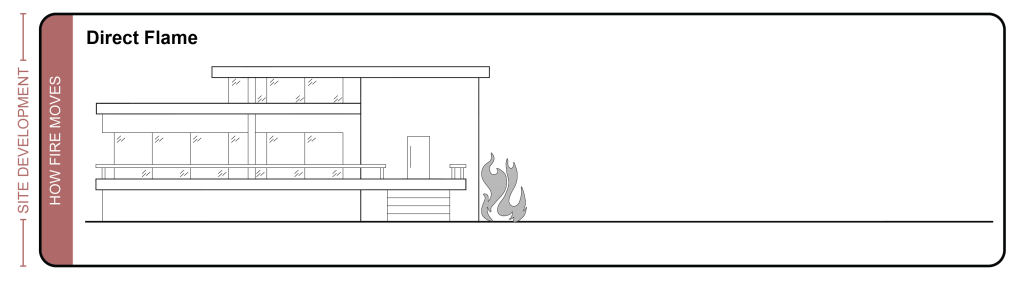
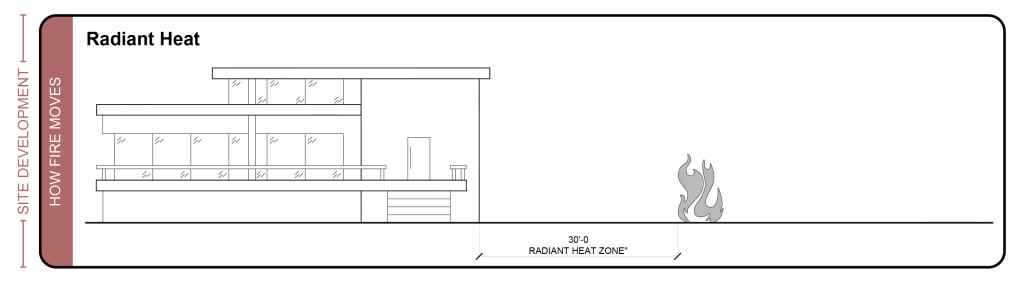
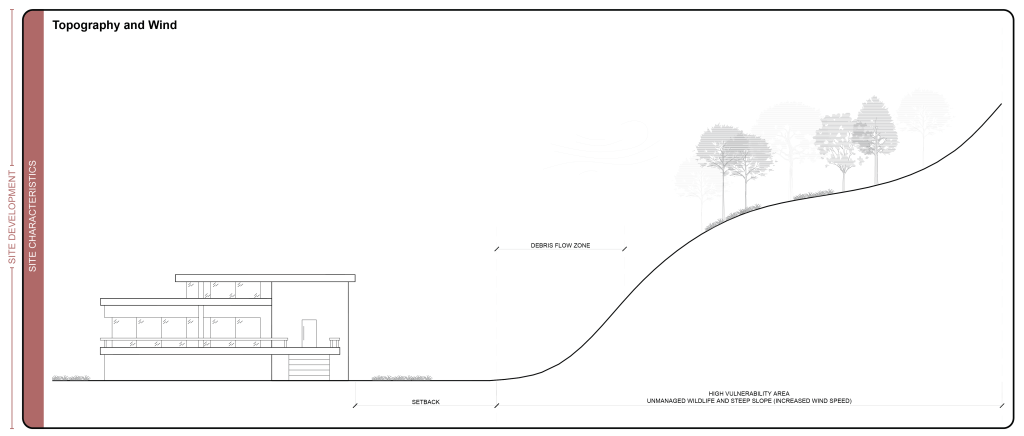
In recent posts, we’ve explored how site management and defensible space strategies can be utilized to enhance the fire resiliency around a structure. In the final post of the series, we’ll examine how the structure itself plays a role in fire resilient design and how hardening techniques can be used in conjunction with defensible space strategies to provide a coupled approach to fire protection.
We’ll also explore some of the cost implications of fire resilient design and how engaging with the right partners can help in determining what strategies might be best suited for a particular project.
No structure can be completely fireproof, but various design strategies can be used to make a structure increasingly more fire resilient.
The Last Barrier – Structural Hardening
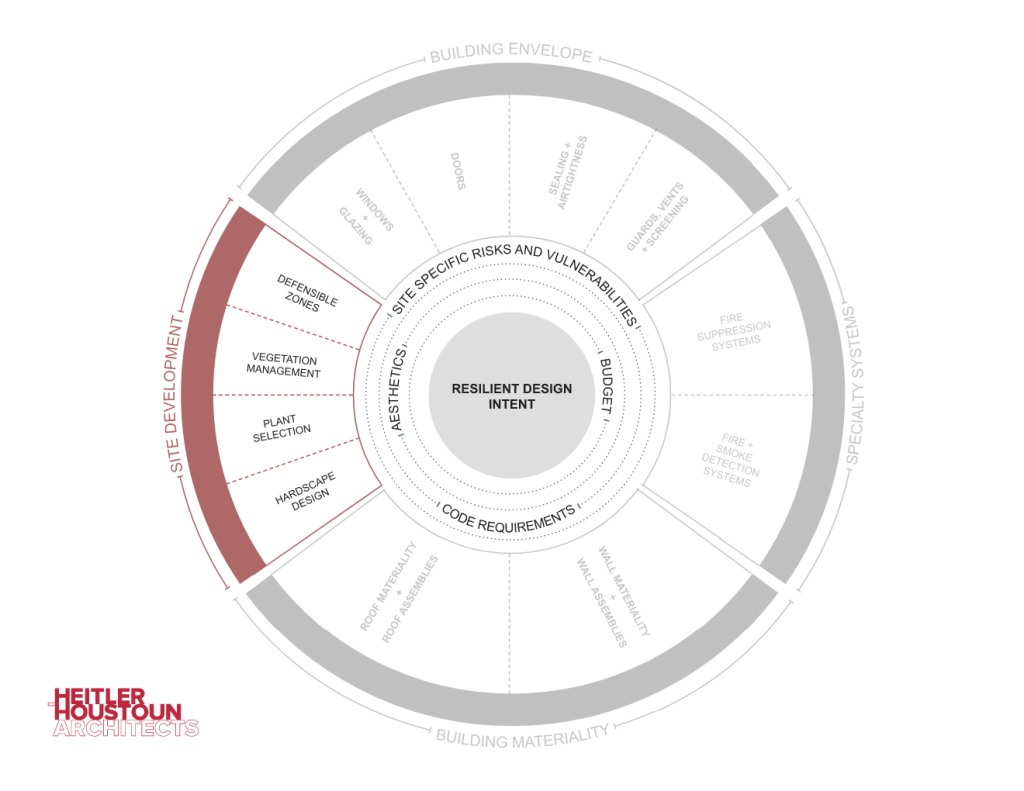
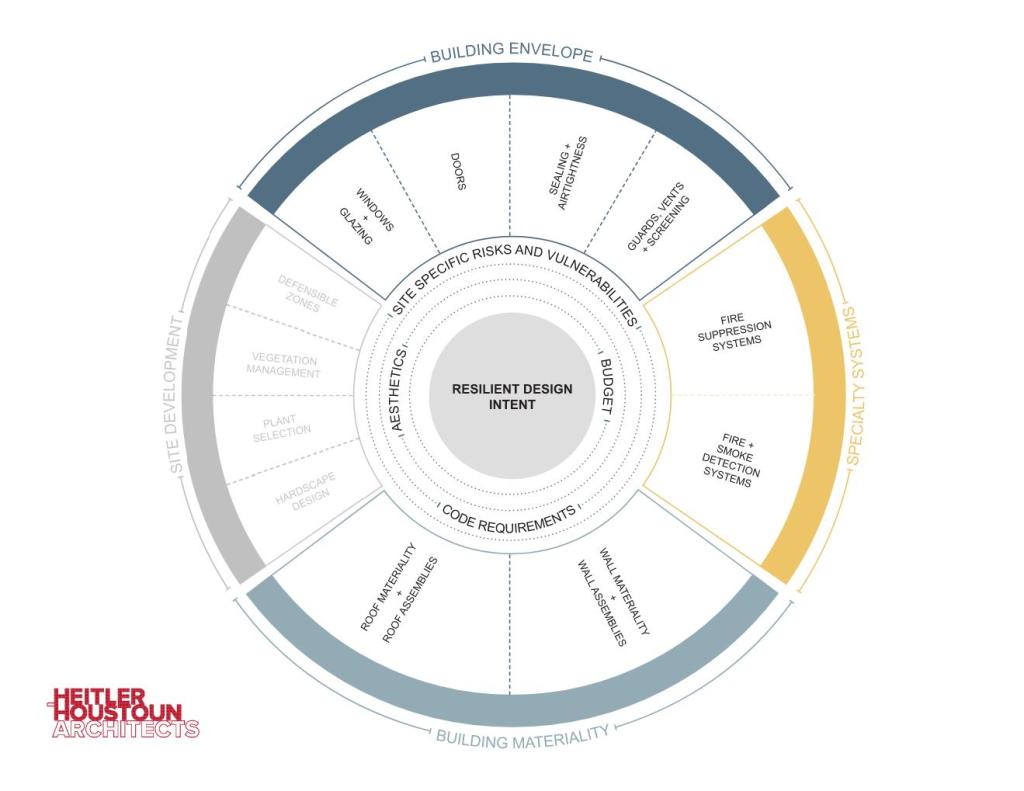
No structure can be completely fireproof, but various design strategies can be used to make a structure increasingly more fire resilient. In considering the structure itself, it’s important to think critically about the various vulnerabilities that exist, from the building envelope (openings and penetrations) to the materiality of the shell (roofing and siding), to the type of systems we put inside (fire suppression, fire alarm and mechanical systems) and how each play a role in whole structure protection. We’ll look at each of these individually and also as part of a larger collective of resilient design decisions that work together.
Building Envelope
- The building envelope is often composed of various openings and penetrations, that if not thoughtfully considered, can provide a direct path of travel for flames and embers into the structure. In many cases, the interior of a structure is composed of highly flammable materials like furnishings, drapery, wall and floor covering, so keeping resilient barriers in place to prevent direct flame or ember contact is critical. The following opening protectives are examples of hardening strategies by component. Note the California Building Code in some cases will have code mandated minimum requirements for some of the elements listed below, especially in fire prone WUI areas.
- Windows and Glazing
- Windows and glazed areas are one of the most vulnerable components of a structure, as they can provide a direct opening into the structure should the glazing break or lose structural integrity due to direct contact or radiant heat. Consider the following mitigation strategies:
- Multi-pane windows with a tempered outer pane
- Low-E coating on windows
- Non-combustible window frames (thermally broken aluminum being one of the better performers)
- Install metal window screens to reduce embers direct contact
- Fire-rated assemblies, which includes a tested assembly comprised of the frame and the glazing. Typical ratings range from 20 minutes to 2 hours. These ratings will come stamped on the window from the manufacturer.
- Limit the amount of windows and the size on areas of the façade that face dense vegetation
- Consider external metal fire shutters, to be deployed in a fire related event.
- If using skylights, use glass panes in lieu of plastic.
- Windows and glazed areas are one of the most vulnerable components of a structure, as they can provide a direct opening into the structure should the glazing break or lose structural integrity due to direct contact or radiant heat. Consider the following mitigation strategies:
- Doors
- Like windows, doors can provide a direct opening into the structure if not constructed with the proper assembly. Consider the following mitigation strategies:
- Non-combustible and ignition resistant cladding (exterior finish)
- Ideally a solid-core wood or metal door.
- Fire-rated assemblies, typically with a minimum rating of 20-minutes.
- Use seals and gaskets around the perimeter of the door itself, including the bottom of the door, to prevent both smoke and ember intrusion.
- Garage doors shall limit any gaps around the perimeter to an 1/8” maximum and all jambs should be covered with metal flashing. Equip the door itself with a battery backup.
- Like windows, doors can provide a direct opening into the structure if not constructed with the proper assembly. Consider the following mitigation strategies:
- Sealing and Air Tightness
- Creating an airtight building envelope can reduce the risk of smoke and embers intrusion by eliminating small gaps that are common-place in conventional construction practices. Consider the following mitigation strategies:
- Install a fire rated WRB (Air and Water-Resistant Barrier) around the perimeter shell as opposed to a combustible barrier.
- Seal all penetrations (outlets, vents, utility lines) with fire rated sealant/caulk.
- Creating an airtight building envelope can reduce the risk of smoke and embers intrusion by eliminating small gaps that are common-place in conventional construction practices. Consider the following mitigation strategies:
- Guards and Screens
- Various openings or assemblies around the structure can and should deploy screens and guards to limit the intrusion of embers. Consider the following mitigation strategies:
- Metal gutters in lieu of PVC or plastic
- Debris guards on all gutters
- Ember resistant vents for conditions like attic vents, crawlspace vents, heating ventilation and air condition vents (through-wall vents and roof vents)
- Shutters over large vents like gable end vents and crawlspace vents
- Various openings or assemblies around the structure can and should deploy screens and guards to limit the intrusion of embers. Consider the following mitigation strategies:
Building Materiality
- The composition and materiality of the structural shell, specifically the roof and exterior walls are particularly vulnerable given the amount of surface area exposed. As such, special consideration needs to be given to ensure these assemblies are thoughtfully designed to enhance resiliency as it relates to fire performance. Note the California Building Code will have code mandated minimum requirements for some of the elements listed below, especially in fire prone WUI areas.
- Roofing
- Roof coverings are typically fire rated ranging from Class A (more resistant) to Class C (less resistant), to unrated. Both the material and the assembly itself can carry a rating, depending on the situation. Meaning, you can have a Class A rated assembly, or you can utilize a Class A rated covering, which carries the rating as a standalone element. Consider the following mitigation strategies with regards to roofing:
- Stand-alone Class A roof
- Asphalt fiberglass composite shingles
- Tiles – concrete, metal, clay or slate
- Some metal roofing (by manufacturer)
- Class A rated assemblies
- Aluminum metal roofs
- Some recycled rubber and/or plastic composite materials
- Block annular spaces between the roof decking and the covering
- Install non-combustible metal drip edge
- Stand-alone Class A roof
- Roof coverings are typically fire rated ranging from Class A (more resistant) to Class C (less resistant), to unrated. Both the material and the assembly itself can carry a rating, depending on the situation. Meaning, you can have a Class A rated assembly, or you can utilize a Class A rated covering, which carries the rating as a standalone element. Consider the following mitigation strategies with regards to roofing:
- Roof Overhang
- The area under the roof (open eave or soffit) is very vulnerable to all forms of fire contact, including direct flame, embers and radiant heat. Consider the following mitigation strategies with regards to roofing overhangs:
- Avoid open eaves, elect for soffited eaves or no overhang
- If using a soffit, consider a 1-hour rated flat assembly
- Consider unvented soffits
- Limit re-entrant corners and roof valleys
- The area under the roof (open eave or soffit) is very vulnerable to all forms of fire contact, including direct flame, embers and radiant heat. Consider the following mitigation strategies with regards to roofing overhangs:
- Wall Assemblies and Materiality
- Much like roof eaves, the exterior wall is susceptible to all forms of fire contact. Both the wall assembly itself and the materiality should be considered as key design elements. Consider the following mitigation strategies:
- Non-combustible siding like concrete, fiber cement, three coat stucco, masonry and metal (steel)
- Apply fire retardant coatings to combustible surfaces (if permitted by code) to elements like trim.
- 1-hour rated wall assembly with
- rated exterior sheathing
- metal studs in lieu of wood
- mineral wool in-wall insulation
- Type X interior gypsum wall board on interior
- Much like roof eaves, the exterior wall is susceptible to all forms of fire contact. Both the wall assembly itself and the materiality should be considered as key design elements. Consider the following mitigation strategies:
Specialty Systems
- The use of specialty systems are becoming increasingly more common in response to wildfire events. These systems require planning ahead to ensure the right infrastructure is in place. Consider the following mitigation strategies:
- Interior Fire Suppression Systems
- Often tied to the municipal infrastructure system but can be well-based if pre-planned.
- Can be triggered by connected fire alarm system, or
- Types of systems include: wet (water based), dry (filled with compressed air until activated), deluge (multiple heads triggered simultaneously), pre-action (activated by smoke or heat, heads can act independently), foam (uses foam and chemical retardants)
- Fire Alarm Systems
- Smoke detectors in key areas. There should be one smoke detector in every bedroom, one in every hallway, and minimum of one on every level.
- Heat detectors in key areas. Heat Detectors should be located in the kitchen, laundry room, and garage.
- Can be monitored to connect/alert the owner and 911, along with shutting down systems like HVAC to limit smoke and ember intrusion and unlocking doors
- Can be activated by both smoke and/or heat
- Interior Fire Suppression Systems
A Cost-Conscious Decision for the Return On Investment
As the cost of building continues to increase throughout the industry, we recognize that the cost of construction is a key component in evaluating the feasibility of a project and that each decision needs to be weighed for the value added. As designers, it’s our responsibility to help clients understand and evaluate both the initial upfront cost, the long-term maintenance costs and to help frame some of the intangibles, like peace of mind in an emergency. Although structures cannot be designed as fireproof, various design decisions can increase the amount of time a family has to safely evacuate, in addition to providing a higher probability that they will have something to come back to post fire. Many of these strategies also have the ability to increase the resale value, by adding additional levels of protection in and around the home and lower long-term maintenance costs. Although some of these strategies will add cost to the job, most of these decisions lead to negligible cost increases.
A 2018 study done by Headwater Economics¹, in conjunction with the Insurance Institute For Business & Home Safety, found that “a new home built to wildfire-resistant codes can be constructed for roughly the same cost as a typical home” and that “many wildfire-resistant home features have additional benefits, such as a longer lifecycle and reduced maintenance.” Although certain components have a higher rate of increased upfront cost, with roofing and landscaping being two of the biggest, over the life cycle of the building these design decisions often pay off.
Although some of these strategies will add cost to the job, most of these decisions lead to negligible cost increases.
THE TEAM APPROACH
Putting together the right team that understands not only the code and site constraints, but also one that respects the clients’ past experiences and what they hope to achieve in the current project is one of the most important decisions on a project. HHA’s project delivery process ensures that thoughtful conversations are had at each stage of the design and that the right partners are part of the discussion to ensure the owner has the information needed to make an informed decision that best suits their needs.
To learn more about how we can work together to incorporate these design strategies in your project, please reach out to us at info@h-h-architects.com.
We’re here to help you navigate the re-build process. For a clear roadmap that outlines the essential steps ahead please download our Project Flow Chart here.
Citations:
¹https://headwaterseconomics.org/wp-content/uploads/building-costs-codes-report.pdf